How I Built a Wind Generator in My Backyard for $150
By Kevin Harris
Originally published 6-15-2007
| Lately I've been spending a great deal of time working on ways to generate my own electricity. It isn't a necessity for me yet, but someday being electrically self-sufficient could really come in handy. My interest started a while back when I stumbled upon a how-to article on building wind generators from treadmill motors and PVC pipe. It sounded easy enough, so I decided to try and design my own. This particular design can be built for $100-$150 if you are thrifty and can regularly generate 50-250 watts (considerably cheaper than a solar panel of similar power output). Here's how I built it for those of you who are interested. Additionally, please check out my new frequently asked questions page for more information not discussed in detail here. |  |
Videos
Before we get into the details of how to build one of these, here are some videos of it in action. Each one demonstrates the behavior of the generator in a different blade configuration.
Six-bladed design (low startup speed and lots of torque, but slowest)
Wide-bladed design (good startup speed, but also very slow)
How does my wind generator work?
Every wind generator, whether they produce enough energy to power a city or to power a small radio, works on these same basic principles...
- 1. The wind blows
- 2. The generator's vane (tail) causes it to turn into the wind
- 3. Blades attached to an alternator/generator experience the force of lift and begin to spin
- 4. The spinning creates electricity for us to use directly or to charge batteries
Sounds pretty simple eh? Well, then how the heck do I build one? Read on...
Tools Required
Surprisingly, building a simple wind generator only requires very basic hand tools, and if you are desperate you won't necessarily need all of them. I used...
- Jigsaw (or a hacksaw and a lot of determination)
- Drill
- (2) Drill Bits (1/2", 7/32")
- Tape Measure
- Crescent Wrench
- Pipe Wrench
- Protractor (to measure angles for the hub)
- Sandpaper (various grits)
Parts Required
I wanted to be as minimal as possible with my design (I'm poor), so I took the already simple designs from around the web and made them even simpler. All of the parts are available at any local home improvement or hardware store, and the entire setup can be constructed in as little as a weekend. Many of the parts you may already have lying around, and lots of substitutions can be made (instead of 1" steel pipe for the tower, you could use an antenna pole for instance). Here are the parts I used to build my generator...
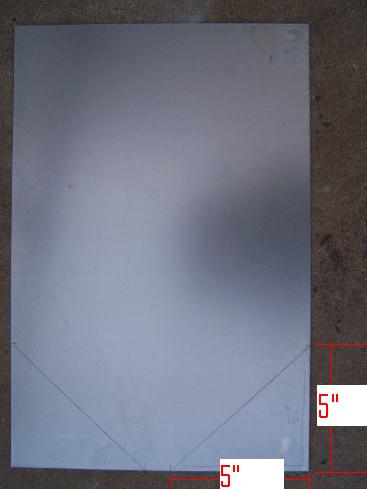
- 10" x 14" Steel Sheet
- 10" x 1/4" Steel Nipple
- 1-1/4" Floor Flange
- 36" x 1" Square Tubing
- 1/2" Bore Circular Sawblade (for hub)
- 5/8" x 1/2" Arbor (to attach sawblade to motor shaft)
- (2) Hose Clamps
- 8" x 4" PVC Pipe
- 30" x 8" PVC Pipe (6" pipe works well too)
- A DC Permanent Magnet Motor (preferably Ametek 30V or 260V 5A treadmill motor)
- (8) 1/4" Bolts (with washers and nuts)
- (2) 1/4" Sheet Metal Screws
- 10-40 Amp Diode (the bigger the better)
All of the above parts (with the exception of the motor), can be picked up in a single stop to any large hardware or home improvement store. For the motor, the most popular types are old tape drive motors manufactured by a company called Ametek. The key is to finding a motor that puts out the highest voltage per RPM. For instance, the Ametek I'm using is rated for 30V at 325 RPM, making it excellent as an electricity generator (for a nice output comparison of the Ametek motors commonly found on eBay and other sites see TLG Windpower). However, pretty much any permanent magnet motor with a good volt/RPM ratio will do. Keep in mind that if you want to generate useful electricity, you will need to produce at least 12V to charge deep cycle batteries or run an inverter. My setup can easily achieve 300-400 RPM in a pretty average wind (for Oklahoma). These instructions assume an Ametek motor with a 5/8" shaft, but can easily be adapted to other motors (search ebay for "wind generator" and you will get a listing of lots of good motors).
Blade Construction
Arguably, the most important part of a wind generator are its blades. A lot of people like to carve their own blades out of wood or composite materials. However, for the rest of us, it's quite easy to make a good set of generator blades from common PVC pipe (and the efficiency isn't too bad either). A 2-3 foot section of either 6" or 8" PVC pipe will do the trick. Before we go any further, here are a few blade theory quickies...
- The longer your blades are the more "swept area" you have to gather energy from and easier your blades will spin in low winds, but the slower your rotation speed will be
- The tips of the blades always spin faster than the base, therefore one needs to take into account the "tip speed ratio" (TSR) when designing blades (there is a reason why old farm windmills will spin all year long at 40RPM)
- The power that can be extracted from the wind increases by the cube of wind speed (something like P=k*v^3 k=constant of wind generator, v=wind velocity)
- According to the Betz Limit, only about 59.3% of power can be extracted from the wind (so in reality P=.593*k*v^3, assuming k accounts for mechanical inefficiencies in the generator motor)
- The higher you get the generator off of the ground, the more wind it will be exposed to (the general recommendation seems to be 25-50ft., but I've had decent results at just 12ft.)
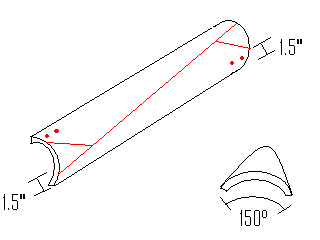
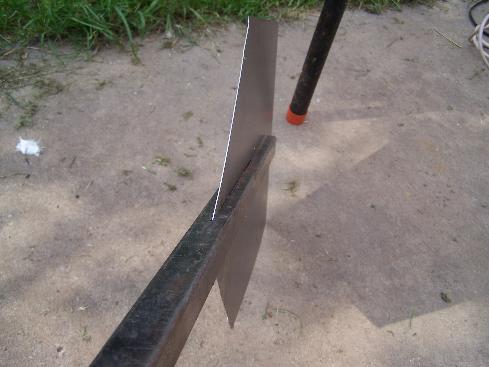
Cutting the blades for this machine is very simple. You will need to cut your PVC pipe into 3 sections, two 150 degree sections and one 60 degree section (I've attempted to illustrate this VERY APPROXIMATELY in my favorite CAD program--and by CAD program I really mean MS Paint). The red lines are cut marks. You will want to use a good tape measure and possibly some construction paper or newspaper to mark everything before you cut. The 150 degree angles will result in wide blades that start up in lower wind speeds, however this will lower the shaft turning speeds. In practice, you will find that the optimum angle could be anywhere from 75-150 degrees. The best idea is start out with a wide set of blades that you can always thin out later if you need to. Remember, measure twice and cut once!

After the blades are cut, I like to go ahead and smooth out all of the edges. If you want to follow aerodynamic theory, you can round the angled (leading) edge and flatten the straight (trailing) edge, but in practice I haven't seen this make much difference with PVC blades. So, you should end up with something roughly like these...

Hub & Blade Assembly
The next obstacle is building a hub to attach the blades to. There are many types of ways that this can be done. I have used circular sawblades and scrap steel disks. I recommend the sawblade approach, as they are readily available and easy to drill through. You can pick up an arbor with a 5/8" or 1/2" shaft at any homestore that will attach directly to the sawblade. Using the 1/4" drill bit, you will want to drill 3 sets of 2 holes 1" apart which each set 120 degrees from the next (this is where the protractor comes in handy, unless of course you are a Euclidean purist in which case you probably don't need a protractor). Here is a picture to make it more clear...
 | It's a pretty simple idea, but circular sawblades have worked out very well for me as hubs. Be sure and get some sort of rubber covering for the tooth edges and/or file down the edges as best you can, because the last thing you want is a hub of death flying at you if your generator decides to rip apart! |
Tail & Pivot Assembly
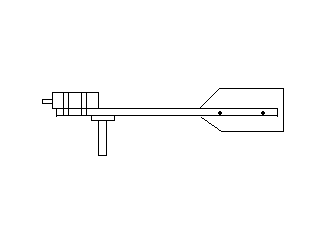
Now we need to build a spinning platform for our generator motor to rest on. To achieve this, we will use some square tubing, a pipe nipple, flange, and small sheet of steel. Here is my "CAD" draft of what I wanted my tail & pivot assembly to look like, and a real picture of some of the parts I used...
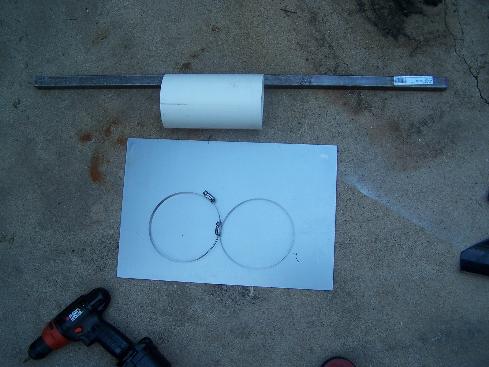
First, I recommend cutting the sheet steel with a jigsaw into a nice design for the the tail (Note: this step is quite unneccessary and ONLY for aesthethic reasons).
We then want to make a cut down the center of the square tubing. The length of the cut isn't that important, but I recommend about a 9" cut (this will help make balancing easier later on). We may then slide the tail metal into the hole and use the 1/4" drill bit to drill and attach the tail to the square tubing.
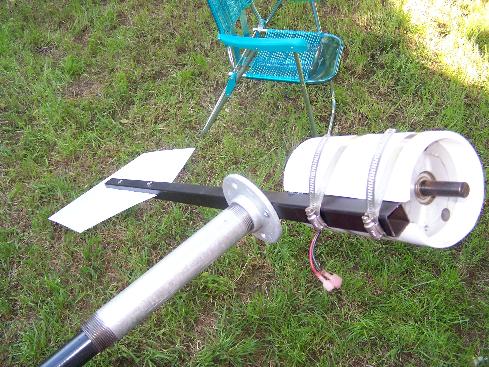
We will then want to cut out a weather covering for our motor. A piece of 4" PVC slips perfectly over the Ametek 30V motor that I use. I cut it out like so (note the side hole for the motor wires).

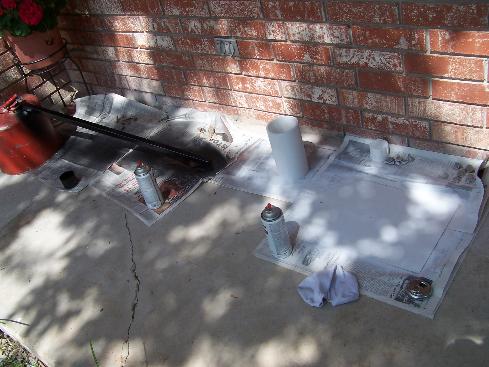
Then we go ahead and paint it all up to seal everything from the elements. I wouldn't recommend painting on your front porch like I did though...
After everything is painted, we can now put it all together. Take the floor flange and put it under the square tubing about 6"-7" from the head. Mark the holes and drill them out with the 7/32" drill bit (or any bit close to but smaller than 1/4"). Attach with the 1/4" sheet metal screws. Use the metal straps to secure the motor and cover assembly, screw on the pipe nipple and you should have something like this...
Tower Assembly
Every wind generator needs a tower. I built mine from some pipe fittings from my local hardware store. If you already have an antenna pole or electrical conduit lying around, then you can skip this section. Here is my recommended parts list for a small extensible tower...
- (2) 5' Sections 1" Pipe
- (1) 1" Pipe Coupling
- (3) 1" Pipe Elbows
- (4) 18" Pipe Sections
- (2) 12" Pipe Sections
The tower base is pretty self-explanatory. Just hook up the elbows and pipe sections to create a base similar to this...
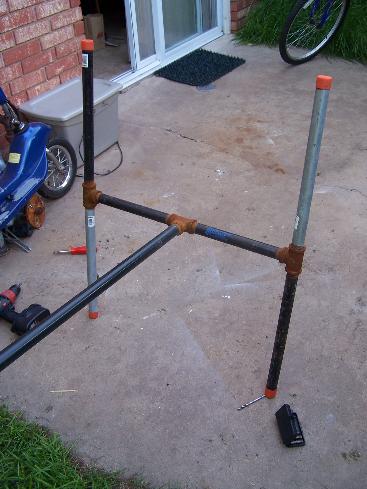
From there we can attach the 2 5' sections of pipe together to form a nice strong mini-tower for our generator to sit atop...
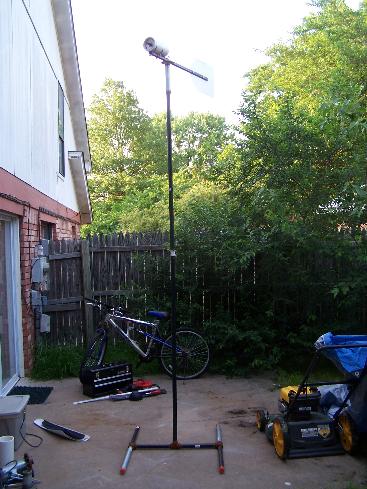
Finished Product
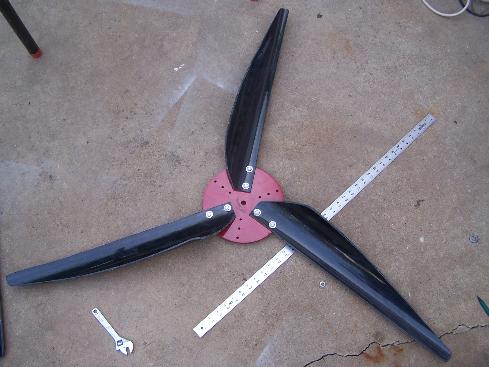
Now we are ready to attach the blades to the motor shaft with the arbor. You will also want to go ahead and attach some wire to the motor and run it to a device to power or a bank of batteries etc...
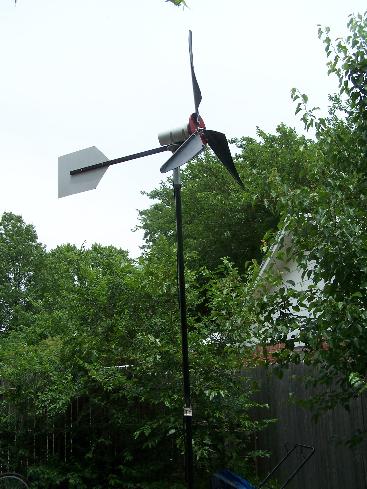
Here is a picture of the experimental design using six blades. It would spin in practically no wind, but would never get past 100RPM. At least it looked interesting!
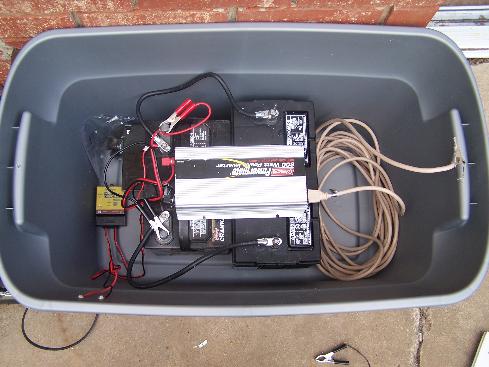
Here is the battery bank I'm feeding into in parallel with solar panels. I am just using two 12V marine deep cycle batteries that can be found at any place that sells car batteries. I keep them in a standard plastic tub with a hole cut in the sides for 12V fans I cannibalized from a couple of old Mac G4s (not pictured). Be sure and put a diode between the battery and the generator so that current doesn't flow from the battery to the motor.
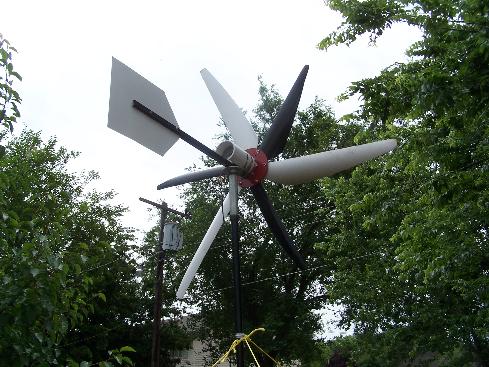
It turns out, cutting the blades a little thinner works better for my area. So I used the large white blades from the previous picture and thinned them out a bit. This resulted in the fastest shaft speeds as seen in first video at the top of this page.

Not too bad for a 22 year old kid from Oklahoma eh (or at least 22 in 2007)? Please feel free to use my contact form if you have any questions, and of course I will gladly welcome your feedback positive or negative.